
Plate Chiller for Robobrew (Brewzilla)
Robobrew (Brewzilla) comes with a solid immersion chiller. If you’re happy with it, then read no further. But if you’d like to make your life a little easier and enjoy your brew day a bit more, then I highly recommend a plate chiller. I won’t get into the details here of what makes a plate chiller awesome because I’ll assume that if you’re reading this, you’d like a plate chiller for your Robobrew too.
There are a nearly countless number of options for equipment that can be used for this process. I won’t bother getting into the various options and instead I’ll just list the exact materials I used. They work excellent and you should have no reason to choose anything else. And before you ask, yes, I’m very cheap and chose the cheapest components I could find, while also making sure they were of high enough quality.
First, let’s start with the bill of materials
- (1) Plate Chiller – HFS(R) 7.5″ X 2.9″ 20 plates ($49.99)
- (2) Male Camlock with 3/4″ NPT fittings ($6.99 ea)
- (1) Male Camlock with 1/2″ barb ($6.99 ea)
- (2) Female Camlocks with 1/2″ barb ($8.99 ea)
- 6ft+ of 1/2″ ID x 3/4″ OD silicone tubing (~$5.00 per ft)
- (1 pack) Garden hose quick disconnects ($9.99)
- (1) 15ft garden hose ($7.99)
- (2 packs ) 3/4″ garden hose repair kit ($5.99 ea)
- (1) Blichmann ThruMometer ($30)
- (1 pack) Zip Ties ($8)
- Teflon tape ($8)
Grand Total: $186 (less if you already have some common items)
Part Selection
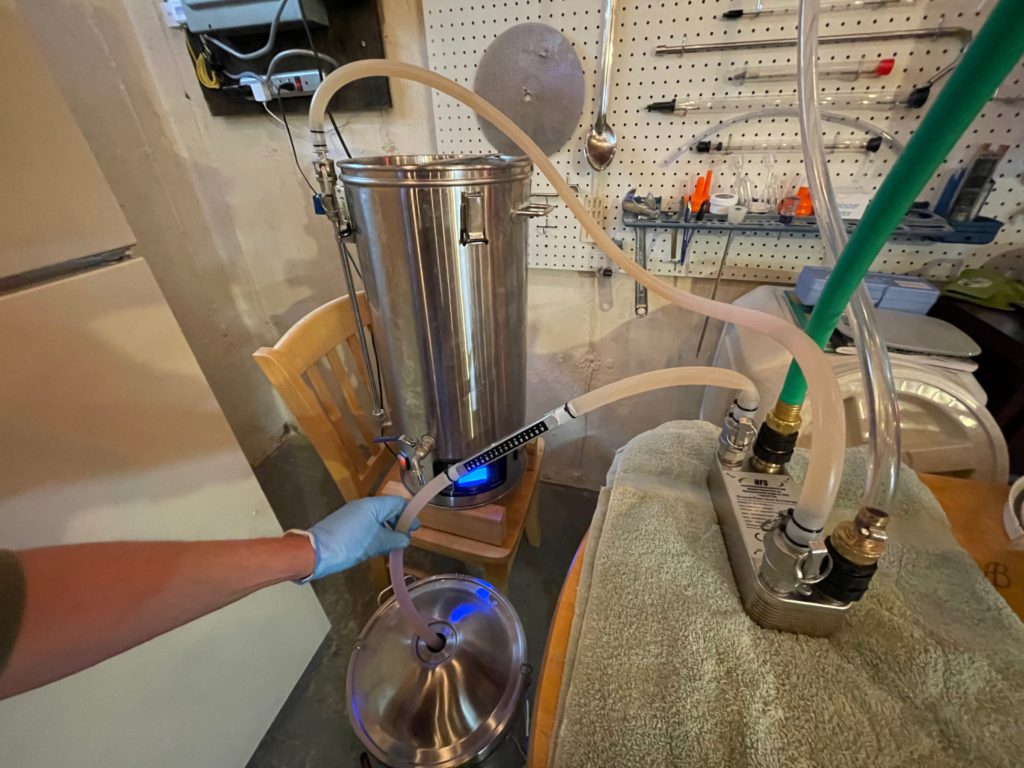
For 5 gallon batches, the small 20 plate chiller will get the job done. Here in New England we get very cold water in the winter time. When I run my faucet at full speed I can pump my wort directly into my fermenter at 70 degrees. In the summer it will take a bit longer so I’ll just recirculate back into the kettle until the ThruMometer tells me that the wort is coming out an appropriate temperature for pitching yeast.
Using the camlock quick disconnects is a no brainer. This allows you to bypass the recirculation arm and connect your chiller directly to your pump. Besides, the recirculation arm is designed for 3/8″ ID tubing so you wouldn’t want to use it anyway.
I chose to use male fittings on the chiller itself for a couple of reasons. Having both of them be male fittings means that you can connect your pump to either side of the chiller. This allows you to recirculate your cleaning fluid in both directions when you’re finished with it. Just be careful, because this also means you can run your wort in the wrong direction and not get very efficient cooling.
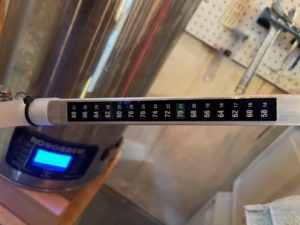
Having the ThruMometer is optional obviously, but it makes life so much easier. You can immediately see what temperature your wort is coming out at which saves you time and energy because once it reaches the appropriate temperature, you can just put the out tube directly into your fermenter. It only takes a couple of minutes for the pump to empty the entire Robobrew.
You will want to make sure to get the 1/2″ ID and 3/4″ OD silicone tubing. The thinner walled tubing is garbage. It’s so thin that your tubes will immediately kink and stop the flow of wort. I don’t even know why they make that stuff.
You’ll want to make sure you use a proper garden hose for your faucet. Using anything less strong could potentially burst. Trust me… (Did I learn this from experience? …. no…. why would you ask that?)
Having quick disconnects on the cold side of the plate chiller is awesome. The pack I recommend comes with enough quick disconnects to put it on your faucet, your garden hose, and your plate chiller. The catch is that you’ll need both ends of your garden hose to have female connectors, hence the garden hose repair kit.
Finally, I use zip ties as “hose clamps” for the silicon hoses.
Assembly
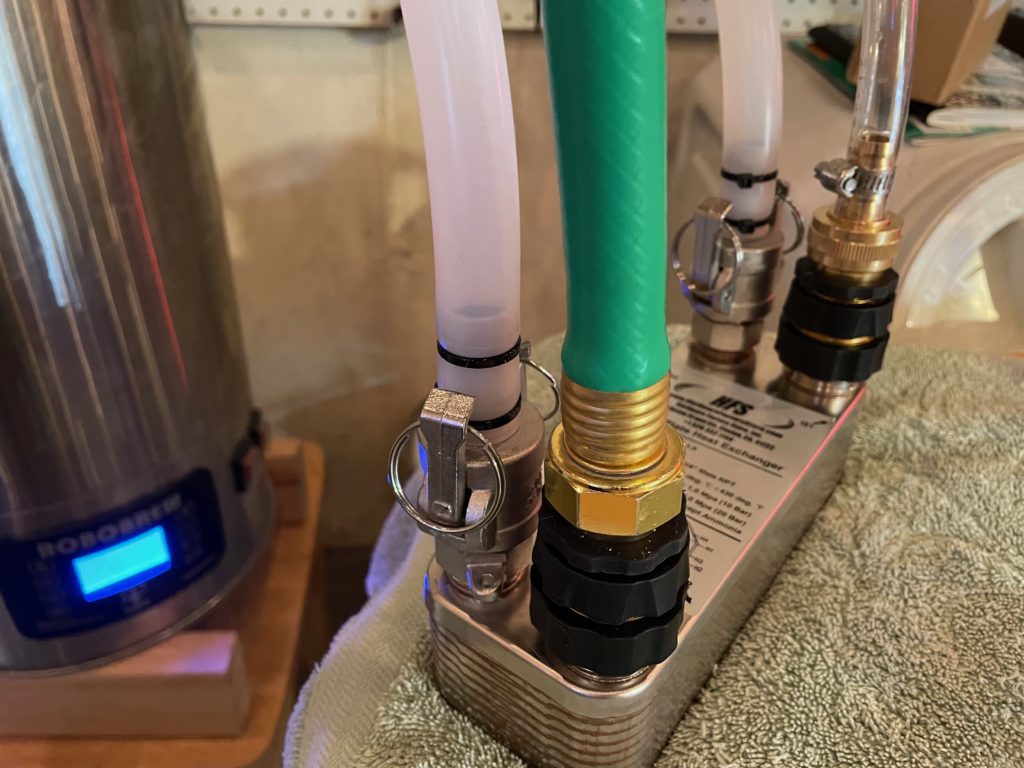
Plate Chiller
You’ll want to attached your male camlocks to the chiller before the garden hose quick disconnects because you’ll need a wrench to tighten these, whereas the garden hose quick disconnects just take hand tightening.
First, apply a generous amount of teflon tape to the threads of the 3/4 NPT studs on the plate chiller. I did about 8 wraps. Then put the male camlocks and tighten with a large wrench. You do NOT want these to leak.
Once the male camlocks are on then you’ll want to add the female garden hose quick disconnects. I found that I needed to use two of the garden hose washers per disconnect in order to get a tight seal. I kept having leaks when I tried to use just 1 each. I added a little keg lube to each washer, just for a little extra protection against leaks and to help them to last longer. Once you have both washers inside the disconnect, just tighten each of these by hand, as tight as you can get it. Don’t worry, you won’t be strong enough to over tighten these.
Hot Side Tubing
Start by determining the length of tubing you’ll need from each side. Keep in mind that for the output you’ll have an extra 10″ or so provided by the ThruMometer. I chose to put a rolling table near my Robobrew while I use my system, so I only needed 6 feet of silicone tubing. I used about 3.5 feet on my input tube and about 2.5 feet on my output tube.
Input Tube
I used about a 3.5 foot tube for my input tube. Insert the male camlock with 1/2″ barb on one end of the tube and then insert the female camlock with 1/2″ barb on the opposite end of the tube. Use zip ties just past each of the barbs to prevent leaks. Warming the tubing can help these zip ties get nice and snug.
Output Tube
You’ll need two pieces of tubing for the output. I used about 2.5 feet of tubing and cut it in half.
One tube you’ll insert the female camlock with 1/2″ barb and the opposite end you’ll insert the ThruMometer. Technically there is no right or wrong way to insert the ThruMometer so just choose a direction you’re happy with.
Insert the opposite end of the ThruMometer into your other piece of tubing. Add zip ties to all of the connections, just past the barbs. Again, warming the silicone tubing will help you to get these zip ties nice and tight.
Use a nice pair of dykes or lead trimmers to cut the excess length of the zip ties. Make sure these are nice and smooth. You don’t want to cut your fingers on poorly cut zip ties. You can also use a small file and clean up the sharp edge.
Cold Side Garden Hose
Start by measuring how long you need your garden hose to be in order to reach your faucet and to reach your drain. Cut the garden hose in half (or whichever dimension you determined) and grab your repair kits.
Input Hose
Use the hose with the female fitting still attached as your input hose. On the cut end, drop a hose clamp around the hose, and then insert the female fitting from the repair kit. I found that using a little keg lube helped to get this fitting installed. If you don’t have any keg lube, you could probably just use some petroleum jelly. This means that you should now have a female fitting on both ends of your input hose.
Output Hose
Your output hose should be the hose with the male fitting still attached. On the cut end, drop a hose clamp around the hose, and then insert the female fitting from the repair kit. As with the input hose, using a little keg lube helps this go on easier.
Now tighten up all of your hose clamps (I highly recommend trimming it to length too, so that it doesn’t cut your fingers) and you should be ready to install the male quick disconnects. Thread a male quick disconnect into each female hose fitting (unless you don’t want a quick disconnect on your faucet). Don’t forget your garden hose washers!
Testing/Preparing
Before brew day, make sure to fill your Robobrew with some water and turn on your pump. Check for leaks. Do the same with your garden hose. If there are no leaks, then add some PBW to your Robobrew and run the pump for a while to make sure the tubing and the plate chiller are nice and clean.
After this you may want to run some fresh water through the plate chiller too to make sure there’s no residual soapy water in there.
Brew Day!
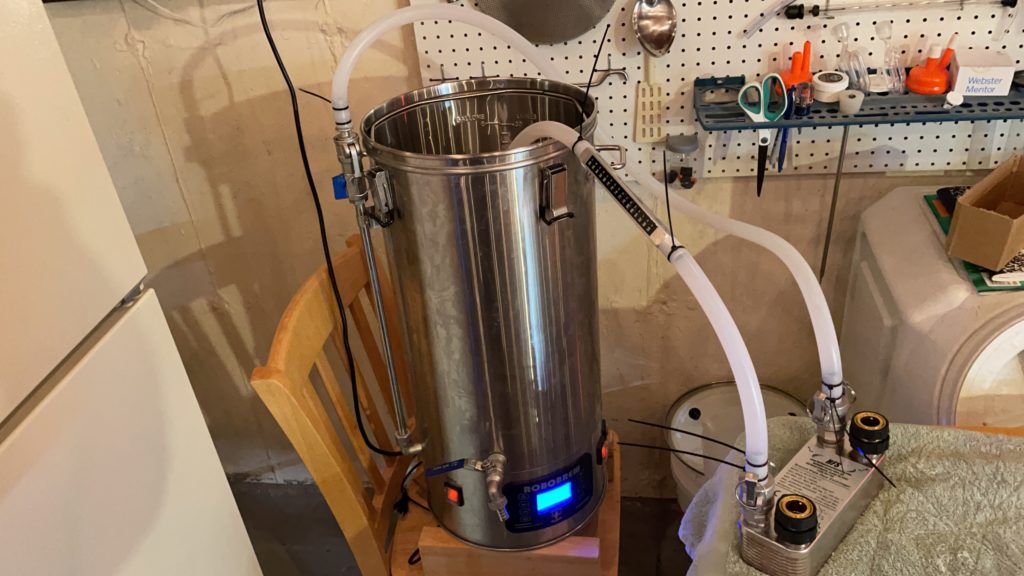
Once you’re ready to use your system, connect all of your tubing and hoses while you’re still boiling. You’ll want the output tube to be flowing back into your kettle at first. Make sure you have your cold side hoses connected to flow the opposite direction as your hot side tubing. If you run these both in the same direction, you’ll get very little cooling power.
I start by running boiling wort through the system for at least 10 minutes, in order to sanitize everything. I don’t like to take any chances.
(Side Note: I *highly* recommend some kind of a hop filter or hop spider. You don’t want to clog your pump or your plate chiller on your big double NEIPA)
Once you’re ready to start chilling simply turn off your elements and keep your pump running. Now open your garden hose faucet all the way (you checked for leaks, right?) and watch the temperatures drop. Once you get a reading on your ThruMometer that you like (yeast pitch temp) just close the valve on the recirculation arm, pull the output tube out of the RoboBrew, and insert it into your fermenter. Now open the valve and wait for the system to finish pumping all of your cool wort into your fermenter.
Once you’re finished, I recommend keeping a small bucket or pitcher nearby to catch any drips as you disconnect each tube/hose.
Cleaning
Cleaning is so simple. I start by disconnecting the hot side tubing from the recirculation pump and use a garden hose nozzle to run fresh water through the system. I do this on both sides of the hot side tubing, back and forth, to get as much junk out as possible.
Once it’s running nice and clear and there’s no more hop particles or grains coming out of the plate chiller, then I connect the hot side tubing to the recirculation pump again. Then I put all of my various brewing pieces into the Robobrew (malt pipe, extra tubing, mash paddle, false bottom, hop spider, etc.) and fill it almost to the top with cold water. I turn on the heating elements and set the temperature to about 140° F and then add an appropriate amount of PBW (I’ve tried everything else, PBW is the best).
Now I turn on the pump and let the soapy water recirculate through the plate chiller for at least an hour. After an hour I turn off the pump, lift the plate chiller into the air to get most of the water out (prevents spills), then I swap the two female camlocks on the plate chiller so that I can reverse the direction of flow through the plate chiller, and run the pump for another 20 minutes or so. This ensures that the plate chiller gets thoroughly cleaned and there’s no hidden surprises when I go to brew next time.
Finally, I drain the Robobrew and rinse everything off and then put another couple gallons of water in the Robobrew and turn on the pump to rinse the chiller out really well. You could also just spray the end of a garden hose nozzle into it to rinse it, but you’ve got to rinse out the pump of your Robobrew anyway, so this is just one less thing to do manually.
Conclusions
It occurred to me while writing this that I spent a lot more money on this project than I expected to. I already owned the garden hose and the teflon tape and zip ties, but that still means I spent around $150 to do this.
Had I known going into this that I would have spent $150, I’m not entirely sure I would have done it. Not because it’s not worth every penny, it definitely is, but because I’m super cheap.
Am I glad I spent the money to do this? ABSOLUTELY! Brewing with this is so much easier than an immersion chiller and cuts out at least 30 minutes from my typical brew day. I value my personal time and saving 30 minutes of a rather boring task of chilling wort, is totally worth it to me, considering I brew 1 to 3 times per month.
I can’t recommend this enough. If you’ve even considered doing this yourself, don’t hesitate. Get the materials, put it together, and enjoy the most leisure wort chilling experience you’ll ever have.
CHILL!